App setup.
Make the iOS and Android app yours.
Point the app at your server, give it your own bundle id, name and icon, connect Firebase push and AdMob, create the in-app products and set up app links. Every step below names the exact file.
01Server address
The commands on this page work in any terminal where Flutter is installed, including PowerShell. iOS builds need a Mac with Xcode; on Windows you can build and run the Android app. Run tool/check_release.sh in WSL or Git Bash.
The app finds the server through the build-time value API_BASE_URL (app/lib/core/api.dart). Use your https address:
flutter run --dart-define=API_BASE_URL=https://api.example.comWithout it, the app uses a server on your computer (http://localhost:8080, or http://10.0.2.2:8080 on the Android emulator). Release builds need https.
02Bundle id, package name and app name
The package ships with the placeholder com.yourcompany.reelora. Change it before you publish:
| Platform | What to change | Where |
|---|---|---|
| Android | Application id | app/android/app/build.gradle.kts → applicationId. The namespace and the Kotlin folder com/yourcompany/reelora may stay; the store only sees the application id. |
| Android | App name under the icon | app/android/app/src/main/AndroidManifest.xml → android:label |
| iOS | Bundle id and team | Open app/ios/Runner.xcworkspace in Xcode → Runner → Signing & Capabilities. Pick your own team (the project ships with an empty DEVELOPMENT_TEAM) and set your bundle identifier. |
| iOS | App name under the icon | app/ios/Runner/Info.plist → CFBundleDisplayName |
The name shown inside the app comes from Console → Brand → Product name (Customization). Enter the same bundle id and package name in Console → Payments and Console → App links.
03App icon and launch screen
- iOS: replace the images in
app/ios/Runner/Assets.xcassets/AppIcon.appiconset(Xcode shows every required size). The launch image is inLaunchImage.imageset. - Android: replace
ic_launcher.pngin eachapp/android/app/src/main/res/mipmap-*folder.
An icon generator such as the flutter_launcher_icons package can make all sizes from one image; it is not included, add it if you want it.
04Android release signing
The release build is signed with the debug key so that flutter run --release works out of the box (build.gradle.kts, buildTypes.release). Before you upload to Google Play, create your own upload key and replace that signingConfig, as described in Flutter's "Build and release an Android app" guide.
05Push notifications (Firebase)
Push is optional. The app initialises Firebase only when the values below are passed at build time (app/lib/services/push.dart), so it works without a Firebase project and no google-services.json or GoogleService-Info.plist file is used.
- Firebase Console → create a project → add your iOS and Android apps with your bundle id and package name. Enable Cloud Messaging and upload your APNs key for iOS.
- In Xcode add the Push Notifications capability to the Runner target (Apple requirement for APNs; the project ships without it).
- Project settings → Service accounts → Generate new private key. Paste the JSON into Console → Push notifications → Firebase service account, then use the Test button.
- Build the app with your Firebase values (from the Firebase app settings):
flutter build appbundle \
  --dart-define=API_BASE_URL=https://api.example.com \
  --dart-define=FIREBASE_API_KEY=... \
  --dart-define=FIREBASE_APP_ID=... \
  --dart-define=FIREBASE_SENDER_ID=... \
  --dart-define=FIREBASE_PROJECT_ID=... \
  --dart-define=FIREBASE_IOS_BUNDLE_ID=...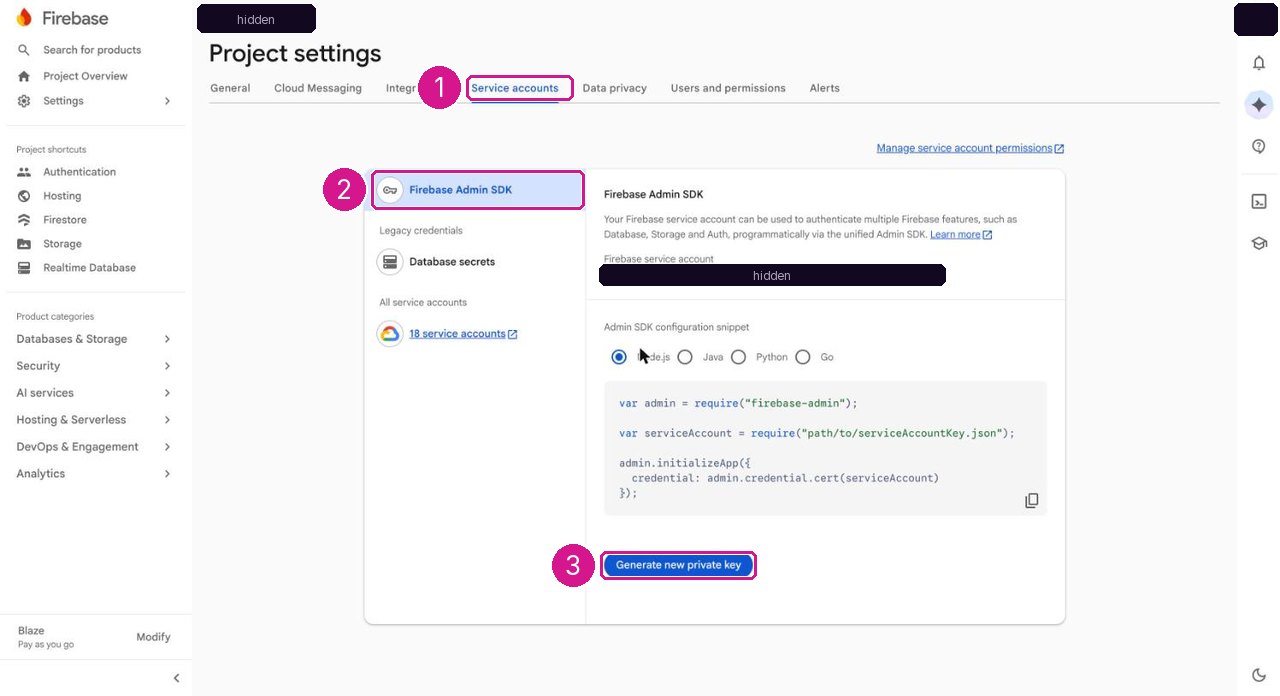
- Turn on Push notifications in the console. New episodes notify viewers who saved the series; campaigns are sent from Push campaigns; "Remind me" on Coming soon sends a push at release.
iOS and Android have different Firebase app ids; build each platform with its own FIREBASE_APP_ID.
06AdMob app ids
The package ships with Google's public sample AdMob ids (ca-app-pub-3940256099942544…). They show test ads only and must be replaced with your own.
| File | Key |
|---|---|
app/android/app/src/main/AndroidManifest.xml | com.google.android.gms.ads.APPLICATION_ID |
app/ios/Runner/Info.plist | GADApplicationIdentifier |
The ad unit ids are not in the app: you paste them into the console (Ads). Debug builds fall back to Google's test units when no unit id is set; release builds show no ads without your unit ids.
07In-app purchases
- App Store Connect → your app → Monetization → In-App Purchases: create a Consumable for every coin pack and every VIP pass (VIP passes are fixed-length; they do not renew).
- Play Console → your app → Monetize → Products → In-app products: create the same products as one-time products.
- Console → Store: for each coin pack and VIP pass, enter the App Store product id and the Google Play product id exactly as you created them. Products without an id are simply not sold in that store.
Server verification
Coins are never added on the device. The app sends each purchase to the server, which verifies it and only then is the transaction finished:
- App Store: StoreKit 2 signed transactions are checked against Apple's root certificate, which is embedded in
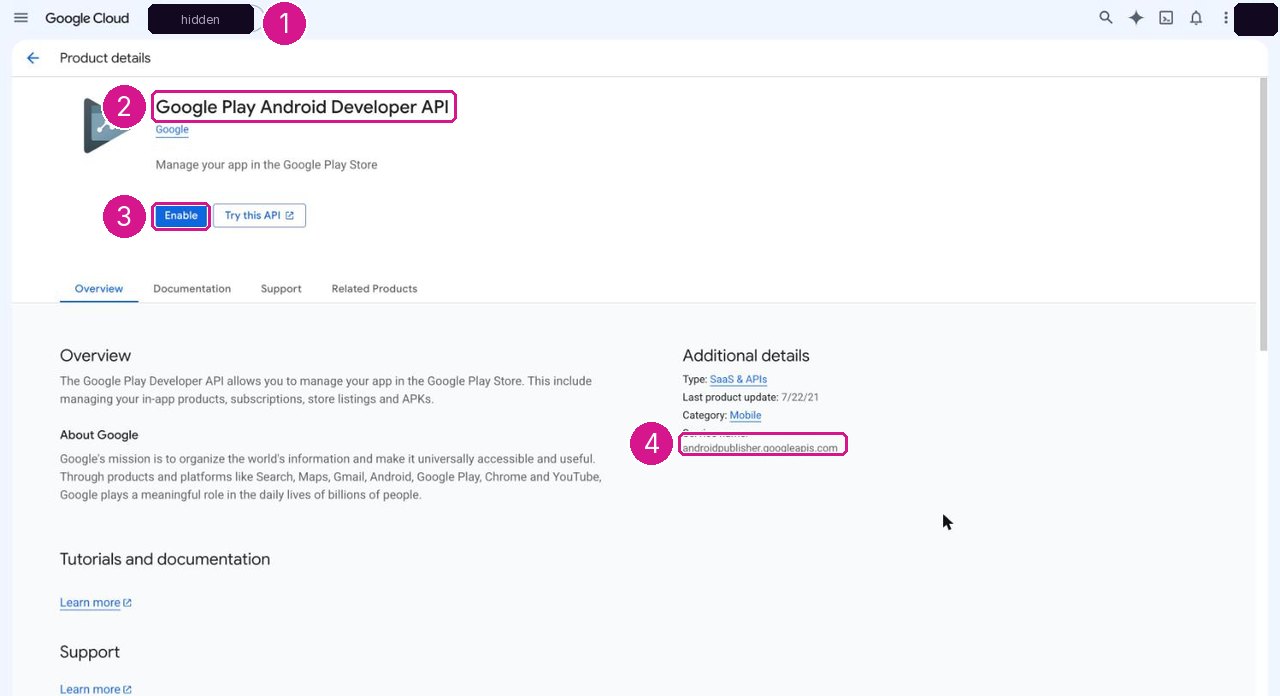
server/src/payments/apple.ts(no certificate file to install). Set Console → Payments → iOS bundle id (transactions for any other app are refused) and App Store environment accepted (Production only, or Sandbox and Production while testing). - Google Play: verified and consumed through the Android Publisher API. In Google Cloud create a service account with the Android Publisher API enabled, invite it in Play Console → Users and permissions, and paste its JSON key into Console → Integrations → Google Play service account (use Test). Set Console → Payments → Android package name.
Each purchase is bound to the account that made it. Then turn on payments.
08App links and universal links
Share and ad links look like https://your-domain/s/<series-slug>?ep=3. With the app installed they open it at that episode; without it they open a page with a rich preview that forwards to the web player.
- Console → App links: iOS app id (
TEAMID.bundle.id: Apple Developer → Membership → Team ID, a dot, your bundle id), Android package name, and the Android signing SHA-256 fingerprints (Play Console → Setup → App signing). The server then publishes/.well-known/apple-app-site-associationand/.well-known/assetlinks.json. - Android: set
appLinkHostinapp/android/app/build.gradle.ktsto your domain (ships aswatch.example.com). - iOS: Xcode → Runner → Signing & Capabilities → + Associated Domains →
applinks:your-domain.
09Release check
Before every store upload run, from the app/ folder:
sh tool/check_release.shIt lists every place that still holds a value you must replace, and exits with code 1 while anything is left:
- Google's sample AdMob app id in
Info.plistandAndroidManifest.xml; - the example bundle id
com.yourcompany.reelorain the Xcode project andbuild.gradle.kts; - the example app-link host
watch.example.com.
Firebase needs no file: the script reminds you that push is configured at build time with --dart-define (above).
10What this costs you
Publishing needs an Apple Developer Program membership (yearly fee) and a Google Play developer account (one-time fee). Firebase Cloud Messaging is billed under your Firebase project's plan; check Firebase's pricing page. Store commissions on in-app purchases are on Payments. See Costs not included.
11Release builds
cd app
flutter build appbundle --dart-define=API_BASE_URL=https://api.example.com   # Google Play
flutter build ipa --dart-define=API_BASE_URL=https://api.example.com         # App Store
Add the Firebase defines if you use push. Bump version in app/pubspec.yaml (ships as 1.1.0+110) for every store upload. Store submission steps are on Deployment.